Showing posts with label Settlement. Show all posts

Wednesday, November 7, 2012

Gunpowder Treason Day - Bringing Familes Together?

From Julie H., historical interpreter:

Remember, remember, the fifth of November,
gunpowder, treason, and plot!
I see no reason why gunpowder treason
should e'er be forgot!

Okay, so that's a modern poem about what the English call "Guy Fawkes Day" or "Bonfire Night." But before we get to the colonial American version of the holiday, which we celebrated in good fashion here at the Frontier Culture Museum, we will answer the question, just who is Guy Fawkes?

In 1605, Guy Fawkes and a group of English Catholic conspirators had finished digging an underground tunnel from their tenant house to the nearby House of Lords. They filled the end of the tunnel with many barrels of gunpowder, with the intention of blowing up Parliament. However, their group had some fellow Catholic friends in Parliament, and a conspirator sent one of the Catholic lords an anonymous letter, warning him to stay away from Parliament for the start of the new session. The lord brought the letter to King James, who ordered a search below the building very early on November 5th, shortly before they planned to light the fuse. The gunpowder was discovered, and Guy Fawkes had been the unlucky conspirator on watch that evening. He was arrested, tortured, tried, and he and his fellow conspirators were found guilty of high treason. The men were hanged, drawn, and quartered.

Since then, England has celebrated the King James' assassination survival, and that Guy Fawkes and his Catholic conspirators failed to blow up Parliament. While initially a small observation in London, it became so widely celebrated across the British colonies that by the 1660s, King Charles II announced it a holiday. The event continues to be celebrated today in England, marked with fireworks, bonfires, and parades.

So why did the American colonies pick up and celebrate the tradition? The English-dominated colony in the 17th century was more than happy to join in a holiday that involved bonfires, parades, burning effigies, shooting off guns, and drinking to the health of the King and Parliament. Moreso, according to historian Brendan McConville, the British frequently viewed the American colonists as inferior, and so colonists spent nearly two centuries trying to prove themselves every bit as British as the mother country. The colonists took to obsessively adopting British customs, fashions, and holidays, with overseas travelers penning down their dismay at the ladies in Williamsburg dressing in finer clothes daily than their wives in England do on Sundays. British soldiers during the French & Indian War tromping through the backcountry were shocked to discover fine porcelain on the shelves in small rustic cabins. Historian Timothy Breen remarks that the common British subject knew fairly little about the colonists, and held stereotypical beliefs of Americans. A New England preacher, Reverend John Barnard, went to visit London, and conversed with a local gentlewoman after a church service, who was surprised that his skin was white and that he spoke English, for she supposed all Americans to be natives. With such false beliefs circulating, who can blame the colonists for their obsessive Anglicism?

The early/mid 18th century saw non-English waves of immigrants reach American shores. The Germans and the Northern Irish came to America, escaping deteriorating conditions in Europe, and seeking the opportunity and promises of land America offered. They had no reason to care for the health of bygone English kings or Parliament. And yet, they enthusiastically picked up the celebration in America with their English neighbors! WHY? One simple reason. Guy Fawkes was Catholic, and the holiday had picked up a decidedly anti-Catholic tone. They not only burned an effigy of Guy Fawkes, but of the Pope! And the uber Protestant Germans and devoutly Presbyterian Northern Irish could easily get behind an anti-Catholic movement.

The holiday spread from New England to Charleston, SC, referred to as "Gunpowder Treason Day," but perhaps most commonly as "Pope Day." As mentioned, Americans held parades, made large bonfires, shot off guns, and drank. They burned effigies of the Pope (Clement XII from 1730-40, and Benedict XIV starting 1740). They occasionally threw in Guy Fawkes, and sometimes The Pretender (from the Tudor/Stuart dynasty who claimed to be the rightful heir to the throne after William & Mary took over). But the main feature seemed to be the Pope. The holiday was one of few that nearly all the major groups of immigrants could bond together to celebrate, and helped unite us under the British monarch.

Whew. So this past Monday, November 5th, our 1740s staff showed visitors and school groups a jolly good patriotic time. We shot off the smooth-bore, built a bonfire, had school kids find a good-sized stick, lined them up, and had them yell, "GOD SAVE THE KING!" as they threw their stick into the bonfire. I couldn't get photos of that, but here is the excitement of building the bonfire, and burning our "effigies."

We put the bonfire in the center of our cornfield. Our intention is to spread the ashes through the soil. We decided to leave two cornstalks in our field, and built the fire around them. They represented Benedict XIV and The Pretender.We didn't have time to make a real effigy.
The stalks catch, and quickly fall.
With both corn stalks down, we admire our bonfire, and burn piles of brush and rotten wood we had lying around the site.
With the timely end of the Pope and The Pretender, we made one final effigy. I'd like to introduce you to Bean Fawkes:
 Bean Fawkes is a scarlet runner pole bean. Here he is, all comfortably enjoying his life.
What's that behind you?
 Oh no!
 Bean Fawkes is sentenced. Burn him! His final moments draw nigh.
We'll spare you further gruesome pictures of Bean Fawkes succumbing in the hot coals.

So there it is. Guy Fawkes Day, Pope Day, Gunpowder Treason Day. Whether British or American colonist, let's all be glad that that no one blew up Parliament.

Don't you Remember,
The Fifth of November,
'Twas Gunpowder Treason Day,
I let off my gun,
And made 'em all run.
And Stole all their Bonfire away. (1742)


Friday, September 14, 2012

The Celebratory First Fire

From Julie H., historical interpreter:

We're back again to Settlement! Last you saw us, we had daubed up pretty high on the chimney, but hadn't quite finished it yet. When we left off, Andy was still down low enough that I could hand him up globules of mud, while standing on our bench. One rung higher, and I wouldn't be able to reach him. When we started out this past Wednesday morning, we knew that one of us got to be on the ladder. The other would be forced into an uncomfortable and painful position.

As Andy climbs up the ladder, he considers sitting on the roof. But he would have to lean his body too far forward to reach the chimney top. So he sandwiches himself between the house and the chimney. Not comfortable. I climb up and down the ladder to hand him mud, filler sticks, and the wood. Our usual mud stomper isn't there, but another coworker literally jumps in to help.

Our new mud mixer determines that consistency of mud is key, and develops a method of mixing mud together. I won't give away all of his trade secrets, but here is FW making his batch of the "local special."
Hey, what's worse than being caught between a rock and a hard place?
And with that last photo, the chimney is finished! We briefly pause to admire our work, but can barely contain ourselves before dashing inside to celebrate with an appropriate gesture. Andy lights the fire. We've started hundreds upon hundreds of fires at the Frontier Culture Museum, but never with such anticipation, joy, fear, and satisfaction.
 As it starts to catch, a giddy anticipation hangs thick in the air. It is the desperate hope that we aren't going to freeze this winter!
The fire burns, and though it is high 70s outside, we sit around the fire, admiring man's ability to build for himself the most basic of life's necessities: shelter. In an era of modern machines and technology, of computer calculation and laser-guided precision, we can still pick up ax and froe, and use own our body strength to make a home which our ancestors' lives depended upon centuries ago in the wilderness. To us, it is a symbolic celebratory first fire; to our ancestors, it was an essential victory in the name of survival.
Despite the cracks in our daubing and the holes between the shingles of our roof, the fire still spreads a warmth across our humble cabin. (And it didn't catch on fire- a good sign!)

Now, if we can just figure out how to make that front door and keep all that heat in...

We urge you all to come visit us this fall! There are so many other exciting projects around the museum. We'll take a break from Settlement, and in the upcoming posts, we'll check out the thatching in Ireland and see how the flax is doing, see some baking in England, meet some of our animals, check up on our progress with the new American Indian exhibit, and host a grand Oktoberfest in Germany. And don't worry, there'll be plenty of yams too! Until next time.

Sunday, September 9, 2012

Daubing the Chimney

From Julie H., historical interpreter:

We are working on daubing the chimney at our Settlement cabin. Yesterday, we had hoped to finish it, but the thunderstorms had other ideas!

Last time we talked about the chimney, we showed you the stacking process. You saw the chimney dry stacked to the width and height we wanted. We wondered the best way to daub the chimney up next. After some deliberation, and some good advice, we unstacked the chimney, intending to build it up again and daub it as we go.

We just received a large iron pole from our blacksmith, which we had to set in to the chimney, so earlier that week, we drilled some holes in the bottom two wooden beams. Once we unstacked, we used the opportunity to carefully chip away some mud, lift up the levels above the bottom beams, and shove the iron lug pole tightly in to place. It was easy enough to patch it up with more mud when we finished.

So that brings us to the actual daubing. Before we continue to build up, we need to go inside the chimney and patch up some of the older daubing over the wood. It is crucial that the wood be well covered with mud, because any exposed wood is possible to catch a stray spark from the flame. While we accept that our chimney probably will catch fire one day in the future (as did our ancestors), we don't want to tempt fate by doing a poor job daubing the inside and encourage it to burn down next month instead of years ahead.

Chimney daubing, much like daubing the gables on the cabin, require at least three people. We need one person to climb up the chimney to place the wood and to do the daubing, one person to hand them up mud, sticks, and wood, and one person to be making mud back in the pit. Just like the cabin, we need to place sticks in between the wooden frame of the chimney, in order to give the mud some structural support behind it. We thought about stacking up a couple layers, daubing them, and building up in that manner, but since we have to reach inside and down the chimney, we found it best to work a single layer at a time. 
Most of this effort is me waiting for instructions from Andy on what he needs next. "Back beam!" "Front beam!" "Sticks!" "Mud!" "Chunky mud!" "Inside beam-- no, inside beam." "Runny Mud!" "Okay, more sticks!"

Surprisingly, daubing the chimney is a lot messier than daubing the house. The chimney is an awkward shape, and difficult to put a ladder to sit stably next to it. So we have to climb the chimney. This means our shirts and shifts and knees are leaning up against fresh wet mud. We get caked in mud. It probably didn't help that the weather was wet and drizzly the entire day, so the stuff could never dry on our skins to crumble off. Did you notice we all stripped down to our historic underwear again?
Drew admires all the mud he's made for the chimney.
  Below we have the progress of the chimney at the end of the first day of daubing.
We got pretty far. This was the only full day of daubing we've had thus far, so we were able to get a lot done! There aren't many days the three of us are there at the same time, and ever since that day, we've been plagued with afternoon thunderstorms that cut our efforts short. Yesterday, we managed to squeeze in about two hours of work in the morning before clear skies changed and slammed us with heavy rain and thunder.

Now that the chimney is built up taller, we can actually use the ladder. It and Andy are both light enough, and the chimney is strong enough, that we were able to lean the ladder up against it. This will make it easier for him to daub the top sections of the chimney.
This is where we left off. We have nine rows remaining. Our next issue is figuring out how to get mud up to him when he steps up another rung. I'm standing on tip-toes and stretching as far as I can as is (and still standing on that bench), and can barely reach him. I will probably have to climb part of the chimney next time to get mud up to Andy, which means Drew will have to hand me the mud off the tray so I'm not climbing up and down constantly.

We will hopefully have some time this week with the three of us and NO RAIN so we can finish this chimney! It was 52 degrees F this morning when I woke up, and only going to get colder. I can't start fires in an unfinished chimney!

Of course, a nice warm fire on a cool morning is somewhat useless until we make a front door to keep in the heat. Next time you hear from us folks on the Settlement farm, we should have a finished chimney, and the beginnings of a door. Fingers crossed!


Friday, August 31, 2012

Stacking the Chimney

From Julie H., Historical Interpreter:

It's time to take a break from yams and return to Settlement! While yams have been growing, we have been working hard across the museum on the American side to finish building up our chimney before the cold weather hits. Yes, I am aware that the high today reached 92 degrees in Staunton. But we're a month and a day away from October, and that means cold weather! So for this post, we will take you through the steps necessary to build a basic rough chimney for a temporary home in the 1730s/40s Virginia backcountry. The Augusta County Militia guys began this hard job last year, and now our staff is finishing it.

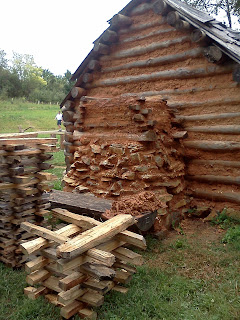
The bottom of chimney is stacked stone. It stops about chest high, because if we continued higher, it would become too dangerous. We aren't stone masons. Neither were they. We would need a stone mason to build it all out of stone, and for a quick shelter that we'd make in a couple months and live in for only a few years, it would be impractical to have a nice stone chimney. In fact, we're lucky we even got to build the bottom chunk of stone! On the other side of the colony, the entire chimney might be stick-and-daub, because there isn't enough rock over there! So the rest of the chimney is made out of wood.

Using the right kind of wood is important. Because the upper portion of the chimney is stacked wood covered in mud daubing, it is likely that as the daub dries and cracks to expose the log, it will catch fire some day. If you pick pine to build your chimney, that stuff will catch a spark and go up in flame before you know it. It's best to pick a harder wood that burns slower, such as oak. It'll give you more time to go outside and pull the chimney down, so the rest of your house doesn't catch.

Once we had our oak tree trunks, we split them all down into quarters, sometimes eighths, about the same size for fence rails. We'll talk more about splitting rails in the future. Here is Andy, determining where to place the next metal wedge, while a wooden glut holds the log open.
 Once they are split to size, they need to be cut down to length. We needed our chimney to taper from a wide bottom to a smaller top, so we had to measure out the exact length we wanted our pieces.
Some of the rails were cut down to length using an ax last year, and these recent ones we did with a period hand saw. See the difference in the look below (note: these pieces have been fully worked into square shapes at this point).

Our rails initially are all shaped like a slice of pie- triangular. In order to get that nice squared-off shape that you see above, pull out a fro, a fro club, and a hatchet. The fro is an L-shaped tool, with the sharp blade on the bottom. The fro club is a big wooden mallet we use to drive the fro into the top of the wood, to pry the wood apart. We also use the fro to make the roof shingles, and all our fence palings. Below, I place the fro to cut off the triangular tip of our piece.
 
Here's the fro club. The pieces are short enough that the fro work is easy. Drive it in, pull the handle, and POP! But, if the wood gives you lots of "stringies" and becomes difficult to pry apart, like this one did, you can use the handle of the fro club to keep the piece open as you slide the fro down to pry lower.
Once the tip is off, the piece is still trapezoidal, so pull out the hatchet and start [carefully] hacking down the wider edge to match the thinner edge.
For the initial stacking, you can stand inside the chimney up on a stool or bench, but at some point, it'll become too narrow to continue inside, and you'll need to get a ladder and continue from the outside.
Once the stacking begins, we need two people. Just because we squared it off earlier doesn't mean it'll sit nice and flat on the piece below! Andy leads the effort by climbing the chimney, and I hand him up each piece, hoping it works on the first try. It occasionally does, but most pieces he hands back down to me, with instructions such as, "Take about a quarter inch from this spot here down to the bottom." I shave the piece down, and hand it back up. Sometimes, it takes a couple tries to get the piece to sit stable on top the chimney.
 We keep doing this until it finally reaches the desired height. It needs to be a little taller than the house, in order for it to draft properly when we build a fire inside. As we learned, it's difficult to judge how much wood you need to reach that height without actually stacking it. Also notice that there is a significant space between the the chimney and the north wall of the cabin. Remember how I said earlier that it might catch on fire at some point? If the chimney leans away from the wall, it'll be less likely to catch too.
When you finish, be sure to take a fun and artsy photo or two! Notice all those little black square smudges on the pieces? Those are the shadows from our iron wedges from when we split the logs in the first step.
 Now that our chimney is finally stacked, we will start daubing it with mud TOMORROW! If you're in the area, come on by tomorrow during museum hours (9-5). Visitors are invited to daub with us, but if jumping in mud isn't your thing, we'll take friendly words of encouragement!


Thursday, July 26, 2012

How to Daub A Cabin

From Julie Herczeg, historical interpreter:

We are so close to finishing the little 1740s Settlement cabin! Thanks to the whole slew of new part time folks, we've finally had the staff to complete the project we began four years ago. All we have to do is build up the chimney a few feet higher, and make a front door.

So how do you daub a cabin? Today, many historic homes with modern residents have long since replaced their daub with a concrete mix in between their logs instead of mud. We won't tell you which ones, but some historic sites cheat and do that too, because the walls don't need constant maintenance, and it helps keep a more comfortable temperature inside for visitors or collections on display. Daubing is also a dirty process, and there aren't many folks like ourselves out there willing to live in a mud pit for days on end.

Before you can daub, you need to cut up small slats of wood to place between each log. This is the chinking process. They should be set in on an angle, which you'll see in some of the later pictures. This is a very important step, as the chinking works as a support frame for the mud. 

If you want to do a proper historic daubing, you'll need to gather up some materials. First, find a bucket to carry water, and a sturdy pick or shovel. Don't use ones you like a lot, because they will get caked in mud. Make sure you clean off your tools at the end of the day, and be prepared to hide them quickly during the day, in order to prevent your curator from having a heart attack.
Next, find a nice spot to dig a pit, where you can get some good dirt with a high clay content. Straw is useful for binding your mud daub, so put a pile next to your pit.
Get some dirt loose in your pit, throw in some of your water, top off with a handful of straw, take off your socks and shoes, and you are ready to jump in! Just be careful, there may be sharp rocks. You can sift your dirt with a screen if you have a fear of cutting up your feet, or plan to have children/visitors jump in too. Sifted or not, hop in and start mixing that mud!
We are much indebted to the Augusta County Militia, a quality Revolutionary War living history organization, for volunteering and helping us work on this cabin. They generously came and built our chimney last Oktoberfest, and then stayed on an extra day after the 4th of July to start the daubing. They also kindly helped train one of our new part timers, whose first day in costume coincided with their visit.

You can probably start anywhere, but we started with the chimney. We plated the mud on some old broken wooden shingles. It's best to have at least one person working inside and one person working outside opposite the other, because some of the chinking or stones may not be as tight as when you first put them in.
 Pick someone who isn't claustrophobic to go inside the chimney to daub.  It helps if they're tall, they'll be able to reach higher.
The Augusta County Militia guys chose Will Gore, who also is a volunteer at our museum. Notice below, where he employs the "Smash and Smear" method of daubing.
 The ACM got our chimney half finished, but taught our interpretive staff some valuable tricks to getting a lot done in a day. We learned to embrace the mud.


Over the course of the next few weeks, Drew (my co-worker) and I continued the daubing, except for the top part of the chimney. We had some summer campers help us on a couple days, too, and while they happily figured out the "smash" part, we found that we needed to jump in and help with the "smear" part. But Drew and I carried onwards.


We got the entire front face of the house done in a day, the back face done another day, and the reachable portions of the north and south facing walls done too. This left us with the top of the gables, in the high unreachable areas.

Luckily enough, we just happened to have enough coverage on other farms to pull our blacksmith, Andy Perry, who built most of the Settlement Cabin four years ago, and another one of our new part timers, to complete the gables. It is necessary to have two people while you daub the reachable spots, but once you get ladders involved, you'll need to double your numbers to four- someone has to hand up the mud.

Now, if you know anything about period clothing, you'll notice we've all stripped down to our underwear. Your clothes will get caked in mud, and it was common back then in situations of intense labor or dirt for people to take off coats, waistcoats, jackets, etc. And the less that gets dirty, the less laundry you'll have to do in the morning!

Our system worked well for the south face wall, but we had to make some adjustments to get the outside north face daubed because of the chimney. Andy made himself a nice little seat, and got started. The two boys inside continued their system successfully.


The Frontier Culture Museum is a living history farm that believes in hands-on participation. We invite visitors to help us do flax processing, grinding oats, cooking, gardening, woodworking, and all sorts of other activities. Throughout the daubing process, I invited many visitors to jump in and join us! Surprisingly, no one ever took me up on the offer. In fact, most people laughed at us, in our mud-encrusted state. Nobody wanted to embrace the mud.

Nobody, until a young a fearless Jonna Reczek arrived! As usual, I invited some visitors to join us, expecting heart break once more, but alas! Imagine my surprise when one girl threw off her flip flops and hopped in the mud! We even warned her of the danger of rocks underfoot, but she trooped on. She not only embraced the mud, she became one with it. Thank you, Jonna!

 We finished daubing the cabin shortly thereafter. Once you finish your cabin, go inside, and take a few minutes just to enjoy the view.
Until next time.